Thursday, February 21, 2013

Dynamically resizing Google Chrome Extensions

Lately I've been working on an extension for Google Chrome to read the last entry of the famous xkcd comic. At a certain point I stopped because I didn't understand how to dynamically resize the popup window of the Chrome extension. This required quite some research to understand what was going wrong, here is how I created the extension, which problem I had and how I solved it.

How I did it

The extension is very easy, it executes a GET request to the xkcd website, gets the content of the index page and returns it. What I used to do, for a matter of simplicity, was getting the content, paste it in an hidden div, get the image of the comic of the day (through a getElementById call) and put it in a visible div.

The Problem

What one would expect is that the Google Chrome popup page of the extension notice the change of content and resize itself to fit the new content. But this doesn't happen. The popup page remains as small as it can get without styles, or of a fixed with/height if specified in the css file. I didn't wanted to have a fixed width/height as comics usually have not a fixed size (sometimes they are as small as a strip, sometimes they are quite big).
Since the popup extension doesn't resize, I though about resizing it using JavaScript:


var width =  document.getElementById("comic").offsetWidth + 10;
var height = document.getElementById("comic").offsetHeight + 10;

//[...]

document.body.style.width = ""+width;
document.body.style.height = ""+height;
document.getElementsByTagName("html")[0].style.width = ""+width;
document.getElementsByTagName("html")[0].style.height = ""+height;


(notice that I get the width and the height of the image and add a small offset to make it visually finer). The fact is that this approach wasn't working either. When opening the extension, one would see it flicker: first a frame of the correct size, and then a resize to the default 10 by 10 pixel frame.

The Solution

The solution was quite simple, but without somebody mentioning it on StackOverflow I would be still stuck. The fact is that the popup of the Chrome Extensions don't resize if there is a hidden element in the HTML tree. That is, basically the whole page I was hiding was preventing me to resize the popup frame. So the solution is:

document.getElementById("hiddenDiv").innerHTML = "";

And that solved every problem. The frame now is the correct size and I can read every two/three days the new xkcd comic.

Friday, February 15, 2013

Newline after every character

I was printing some results for a chart while, after 10 minutes of executing the test, I realised I forgot to put the \n command after the number I wanted to print. I know the numbers I was printing were smaller than 10, so I came up with a useful command to append a new line after each character in a file:

sed 's/\(.\)/\1\n/g' -i filename

And that's it. As easy as that. I'm sorry for the lack of updates but lately I've been very busy.

Wednesday, February 13, 2013

Removing an event listener from an element

Today I was working while I was asked how to remove an event listener from an element which had an
  click event. At first I didn't really remember how to do it, so I Googled a bit and I found this way:


document.getElementById("your_element_id").addEventListener('click', function(){
    //do something
    this.removeEventListener('click',arguments.callee,false); 
}, false);

As you can see, all the work is done by addEventListener and removeEventListener functions. The first one takes as parameter the event (click in this case) and a function that instruct the event listener on what it has to do with that event. The third argument specifies whether the EventListener being removed was registered as a capturing listener or not (set false by default).

The function removeEventListener takes basically the same input parameters. In the element that has to remove, it specifies which element (click), which function (in this case I use arguments.callee as callee is a property of the arguments object and it can be used to refer to the currently executing function), and the third argument that specifies if it was registered as a capturing listener or not.

Of course there are simpler way to do this. It turned out that who asked me how to remove an event listener from an element was using jQuery. In that case the code looks even simpler:


$('#your_element_id').unbind();
//or
$('#foo').unbind('click');
//or
$('#foo').unbind('click', function() {
   //do something
});
//or
$('#foo').unbind('click', function() {
   //do something
}, false);


As the previous examples, also in this case there are three parameters. jQuery is smart enough to take all the three possibilities as fine. The first one will remove every listener binded. The second one every function binded to that listener, the third one will remove that particular function binded to that particular event, while the fourth one just specifies the third argument that by default is false.
And that's it. Pretty easy.

Tuesday, February 12, 2013

setInterval/setTimeout and this

I think everybody is familiar with the setInterval and the setTimeout functions. They create a timed event which will occur after a given timeout. setInterval creates an interval: after the given time it will repeat the same action over and over, while the setTimeout function will only execute the action once. Let's see a small example on how they work:

var timed_function = function(){
    console.log("hello!");
}

var timeout = setInterval(timed_function, 1000);


The shown example will execute every second (1000 milliseconds) the function timed_function.

Now, I recently worked with a timed event and I had to access a variable within this. The naive approach was the following:


//previously set variable
this.message = "hello!";

var timed_function = function(){
    console.log(this.message);
}

var timeout = setInterval(timed_function, 1000);

But this printed undefined. I then discovered that when setInterval or setTimeout are executed, the scope of this apparently refers to the window object, thus it's completely loosing the scope of the object in which the function is executed. The idea to solve this problem is to wrap the call inside another object which has to be called to initialise the timeout:


//previously set variable
this.message = "hello!";

var wrapper = function(that) {
    var timed_function = function(){
        console.log(that.message);
    }

    var timeout = setInterval(timed_function, 1000);
}

//later
wrapper(this);

In this way I basically instantiate the timeout passing through the wrapper function which will keep a reference to this thanks to the input variable of the function. The input variable then will be called inside the timed_function. Hope this helped somebody. I had a couple of issues trying to solve this because I was confused by the scope of the variables. Some folks helped me on StackOverflow luckily, even though some of them where short-sighted and arrogant as always.

Friday, February 8, 2013

Node.JS on Raspberry Pi with OSX, part 3

In this final part I will show how I installed Node.JS on the Raspberry Pi on the Raspbian Wheezy OS.
First of all, open a terminal and execute the following commands:


cd /usr/src
sudo wget http://nodejs.org/dist/v0.8.16/node-v0.8.16.tar.gz


This will change the directory to /usr/src/ and download Node.JS version 0.8.16. I know this is not the last version, but I needed that because my project runs on it and it's not yet time to upgrade to the latest version (even though I'm pretty sure everything is going to be all right).
After the download is completed, extract the tarball:


sudo tar xvzf node-v0.8.16.tar.gz
cd node-v0.8.16

After this you will be in the Node folder, you then should execute the following three commands to build Node.


sudo ./configure
sudo make
sudo make install

This process requires quite some time to complete (especially make). I suggest you don't waste time waiting it to be completed and do something else. Raspberry Pi is not going to break if connected for too much time.
After the commands are finished, Node.JS is ready to be used! You can either run some test with the following commands:


sudo make test


Or just start writing your own web server.

Wednesday, February 6, 2013

Node.JS on Raspberry Pi with OSX, part 2

So after you plug everything (the power supply last), on the screen you should see Raspbian Wheezy booting. Lots of logs in the console and finally what looks like a BIOS screen:


If you don't then you will have the problem I had. In the past hours I struggled a lot because I couldn't see anything on the screen. I tried reinstalling the OS image on the SD (in at least three different ways) and plugging different devices but nothing happened. In the end the problem was indeed the screen (and not the OS as I was supposing). Basically I was using a DELL screen which had a DV input and I was using a HDMI-DV cable. Apparently Raspberry Pi doesn't like that kind of screen inputs. By chance I found a screen with an HDMI input and I could test the Raspberry Pi on it, and it worked!
If you have a different problem I suggest you to try asking on the official forum, there is some helpful people over there.

Anyways, it may also happen that you see something, but not that screen. If that's the case try running the following command:


sudo raspi-config

Then I suggest you set up the keyboard through configure_keyboard and set the timezone through change_timezone. If you happen to have an SD card quite big (more than 4GB at least) then I suggest you also check out expand_rootfs to enable all that space. Also, remember to setup ssh when setting the keyboard by running


sudo setupcon

Then you are good to go! Just hit <Finish> and enjoy your brand new Raspberry Pi. In the next (and hopefully last) post I will show how to install Node.JS and some other useful package.

Tuesday, February 5, 2013

Node.JS on Raspberry Pi with OSX, part 1

During these days I borrowed a Raspberry Pi. I would like to try to set up a Node.js server on it. I decided to write this post to show how I did the whole thing. Just to make things clear, I'm running on OSX.

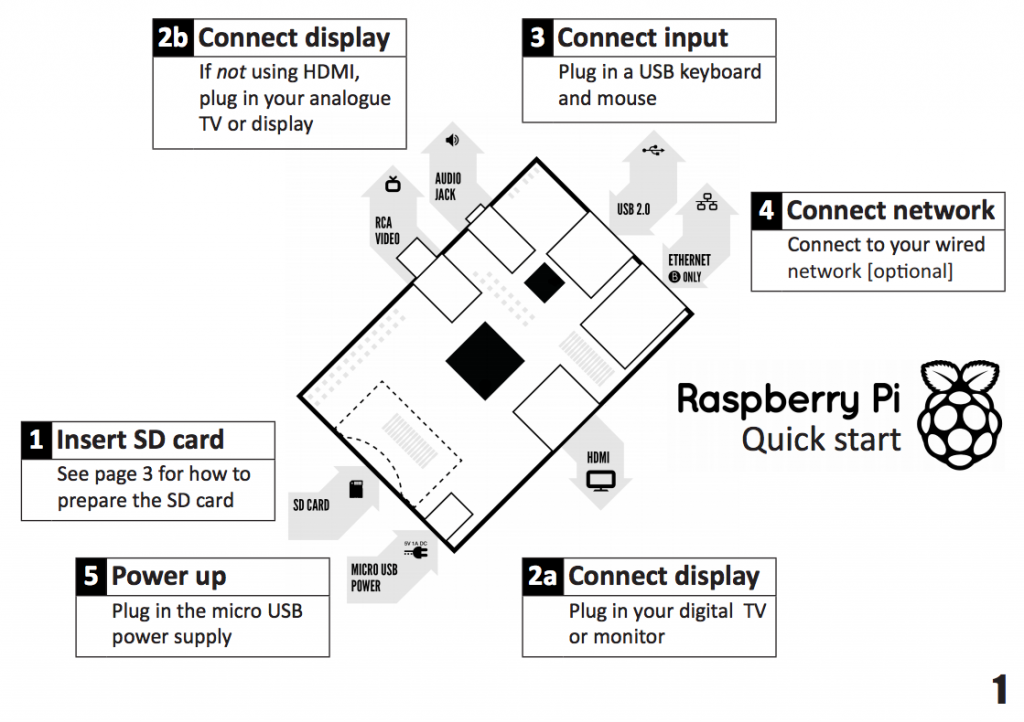
So first of all once you have your Raspberry Pi, you should mount the OS image on the SD card. Some RPi comes with an SD card with everything setup. If that's the case, you are lucky and can skip this post. Otherwise, just connect the SD card to the machine and mount the OS image on it. To do so you first need to download the image from here. I'm using the  Raspbian Wheezy, which is an optimised version of Debian for RPi. After having downloaded the image, unzip it and download this app. Unzip it and open it. It will ask you to locate the image of the OS first, then you will have to choose the SD card on which you want to mount the image, and finally your password. After it is done, you can remove the SD card and plug it into your RPi. The following image shows how to set up the wirings for your RPi.


Now you have everything ready to start programming on your RPi. In the next post (hopefully) I will show how to set everything up at a software level to start your own Node.js server on it.